グーグルマップにボタンを貼り付けるあけなら、設定用のxmlを変えればできます。ボタンを貼り付ける以外のも様々な拡張を考えていいます。
例えば、
方位センサーを使って地図上に方位を表示する。
登録した地点までの距離と方位を表示する。
必要な情報を地図上に表示する。
すでに数年前にこれらの機能は実現していました。(調べてみたら2011年頃)それから現在2020年までの間Androidのソフト開発は中断。そして、再開するとずいぶんと様子が違っていました。開発環境がEclipseからAndroid
Studioに変わった。これが一番の違いです。一番の違いで困ったのは、昔のコードが使えない。また、昔のやり方が使えなくなっているようです。
いろいろ調べて新しいやり方で上述の機能を実施できそうです。
今回の機能実装は、
①現在位置表示のON/OFF
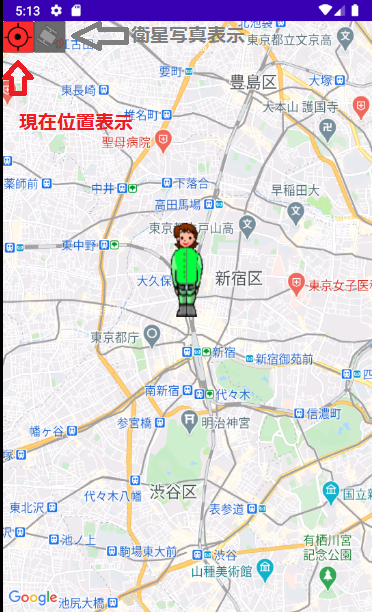
スワイプして地図をみていると現在位置の戻ってしまい不便に感しる場面もあると思います。
現在位置表示ボタン

が赤くなっていると現在位置表示モードです。現在位置にマーカー(女の子)が表示されています。このボタンをタップすると赤から灰色にかわりマーカーが消えます。このモードではスワイプして地図が現在位置に戻ることはありません。
②地図/衛星写真の切替
衛星写真切り替えボタン

で切り替えます。
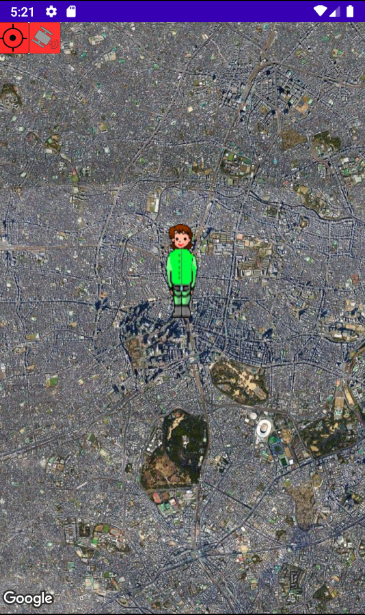
ボタンが灰色から赤になります。
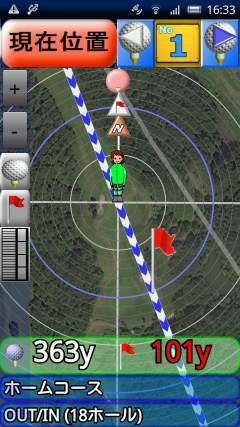
③現在位置表示マーカーの形状を変更。
すマーカーの形状は前述の画像になります。今回の方法では画像の大きさが
縦:3倍
横:3倍
になっています。本来の大きさは上部のボタンより縦が11ドット大きいだけです。何でこんなデカ表示になっているのか不明!?
MainActivity.javaの追加変更です。
package net.sadaji.mapbasic;

import androidx.fragment.app.FragmentActivity;

import android.app.AlertDialog;
import android.graphics.Color;
import android.os.Bundle;

import com.google.android.gms.maps.CameraUpdateFactory;
import com.google.android.gms.maps.GoogleMap;
import com.google.android.gms.maps.OnMapReadyCallback;
import com.google.android.gms.maps.SupportMapFragment;
import com.google.android.gms.maps.model.BitmapDescriptor;
import com.google.android.gms.maps.model.BitmapDescriptorFactory;
import com.google.android.gms.maps.model.LatLng;
import com.google.android.gms.maps.model.MarkerOptions;

import com.google.android.gms.location.FusedLocationProviderClient;
import com.google.android.gms.location.LocationCallback;
import com.google.android.gms.location.LocationRequest;
import com.google.android.gms.location.LocationResult;
import com.google.android.gms.location.LocationServices;
import com.google.android.gms.location.LocationSettingsRequest;
import com.google.android.gms.location.LocationSettingsResponse;
import com.google.android.gms.location.SettingsClient;
import com.google.android.gms.tasks.OnFailureListener;
import com.google.android.gms.tasks.OnSuccessListener;
import androidx.core.app.ActivityCompat;
import android.content.pm.PackageManager;
import android.location.Location;
import android.os.Looper;
import android.view.View;
import android.view.ViewGroup;
import android.widget.Button;
import android.widget.FrameLayout;
import android.widget.LinearLayout;

import com.google.android.gms.maps.model.Marker;

public class MapsActivity extends FragmentActivity implements OnMapReadyCallback {

    private GoogleMap mMap;
    private FusedLocationProviderClient mFusedClient;
    private SettingsClient mSettingClient;
    private LocationSettingsRequest mSettingRequst;
    private LocationCallback mLocCallback;
    private LocationRequest mLocReq;
    private Marker mMarker;

    private FrameLayout m_frameLayout;
    private LinearLayout m_linearLayout;
    private Button m_btnCurrentLoc, m_btnSatellite;
    private final int FP = ViewGroup.LayoutParams.MATCH_PARENT;
    private final int WC = ViewGroup.LayoutParams.WRAP_CONTENT;
    private boolean m_bCurrentLocation = true, m_bSatelliteMap = false;
    @Override
    protected void onCreate(Bundle savedInstanceState) {
        super.onCreate(savedInstanceState);
        setContentView(R.layout.activity_maps);
        // Obtain the SupportMapFragment and get notified when the map is ready to be used.
        SupportMapFragment mapFragment = (SupportMapFragment) getSupportFragmentManager()
                .findFragmentById(R.id.map);
        mapFragment.getMapAsync(this);

        mFusedClient = LocationServices.getFusedLocationProviderClient(this);
        mSettingClient = LocationServices.getSettingsClient(this);
        if (ActivityCompat.checkSelfPermission(this,android.Manifest.permission.ACCESS_FINE_LOCATION)
                != PackageManager.PERMISSION_GRANTED) {
            ActivityCompat.requestPermissions(this,
                    new String[] {android.Manifest.permission.ACCESS_FINE_LOCATION}, 1);
        }

        mLocCallback = new LocationCallback() {
            @Override
            public void onLocationResult(LocationResult locationResult) {
                super.onLocationResult(locationResult);
                if(m_bCurrentLocation == true) {
                    Location loc = locationResult.getLastLocation();
                    LatLng latlng = new LatLng(loc.getLatitude(), loc.getLongitude());
                    mMap.animateCamera(CameraUpdateFactory.newLatLng(latlng));
                    mMarker.setPosition(latlng);
                }
            }
        };

        mLocReq = new LocationRequest();
        mLocReq.setPriority(LocationRequest.PRIORITY_HIGH_ACCURACY).
                setInterval(5000).
                setFastestInterval(1000);

        LocationSettingsRequest.Builder builder =
                new LocationSettingsRequest.Builder();
        mSettingRequst = builder.addLocationRequest(mLocReq).build();

        startFusedLocation();

        //リニアれアウトの配置
        m_frameLayout = new FrameLayout(this);
        m_frameLayout.setLayoutParams(createParam(WC, WC));

        m_linearLayout = new LinearLayout(this);
        m_linearLayout.setOrientation(LinearLayout.HORIZONTAL);
        m_linearLayout.setLayoutParams(createParam(FP, FP));
        m_linearLayout.setBackgroundColor(Color.argb(255, 255, 255, 255));
        //現在位置ボタン
        m_btnCurrentLoc = new Button(this);
        m_btnCurrentLoc.setLayoutParams(createParam(92, 92));
        m_btnCurrentLoc.setBackgroundResource(R.drawable.current_on);
        m_btnCurrentLoc.setOnClickListener(new View.OnClickListener() {
            public void onClick(View v) {
                if(m_bCurrentLocation == true){
                    m_bCurrentLocation = false;
                    mMarker.setVisible(false);
                    m_btnCurrentLoc.setBackgroundResource(R.drawable.current);
                }
                else{
                    m_bCurrentLocation = true;
                    mMarker.setVisible(true);
                    m_btnCurrentLoc.setBackgroundResource(R.drawable.current_on);
                }
            }
        });
        m_btnCurrentLoc.setPadding(0, 0, 220, 0);
        m_btnCurrentLoc.setEnabled(true);
        m_linearLayout.addView(m_btnCurrentLoc);

        //  ボ衛星写地図ボタン
        m_btnSatellite = new Button(this);
       m_btnSatellite.setLayoutParams(createParam(92, 92));
        m_btnSatellite.setBackgroundResource(R.drawable.satellite);
        m_btnSatellite.setOnClickListener(new View.OnClickListener() {
            public void onClick(View v) {
                if(m_bSatelliteMap == true){
                    m_bSatelliteMap = false;
                    m_btnSatellite.setBackgroundResource(R.drawable.satellite);
                    mMap.setMapType(GoogleMap.MAP_TYPE_NORMAL);
                }
                else{
                    m_bSatelliteMap = true;
                    m_btnSatellite.setBackgroundResource(R.drawable.satellite_on);
                    mMap.setMapType(GoogleMap.MAP_TYPE_SATELLITE);
                }
            }
        });
        m_btnSatellite.setPadding(0, 0, 0, 0);
        m_btnSatellite.setEnabled(true);
        m_linearLayout.addView(m_btnSatellite);
        m_frameLayout.addView(m_linearLayout);

        addContentView(m_frameLayout, createParam(WC, WC));


    }

    private void startFusedLocation() {
        mSettingClient.checkLocationSettings(mSettingRequst)
                .addOnSuccessListener(this,
                        new OnSuccessListener() {
                            @Override
                            public void onSuccess(
                                    LocationSettingsResponse locationSettingsResponse) {
                                        if (ActivityCompat.checkSelfPermission(MapsActivity.this,
                                            android.Manifest.permission.ACCESS_FINE_LOCATION) !=
                                            PackageManager.PERMISSION_GRANTED ) {
                                            return;
                                        }
                                        mFusedClient.requestLocationUpdates(
                                            mLocReq, mLocCallback, Looper.myLooper());
                                    }
                        })
                .addOnFailureListener(this, new OnFailureListener() {
                    @Override
                    public void onFailure(Exception e) {
                        // nothing now
                    }
                });
    }


    /**
     * Manipulates the map once available.
     * This callback is triggered when the map is ready to be used.
     * This is where we can add markers or lines, add listeners or move the camera. In this case,
     * we just add a marker near Sydney, Australia.
     * If Google Play services is not installed on the device, the user will be prompted to install
     * it inside the SupportMapFragment. This method will only be triggered once the user has
     * installed Google Play services and returned to the app.
     */
    @Override
    public void onMapReady(GoogleMap googleMap) {
        mMap = googleMap;

        // Add a marker in Tokyo and move the camera
        LatLng tokyo = new LatLng(35.695056, 139.69885);
        mMap.moveCamera(CameraUpdateFactory.newLatLngZoom(tokyo,13f));
        mMarker = mMap.addMarker(new MarkerOptions().position(tokyo).title("Marker"));
        //マーカーの形状変更
        BitmapDescriptor bd = BitmapDescriptorFactory.fromResource(R.drawable.caddie);
        mMarker.setIcon(bd);
        mFusedClient.removeLocationUpdates(mLocCallback);
    }

    @Override
    protected void onResume() {
        super.onResume();
        startFusedLocation();
    }

    private LinearLayout.LayoutParams createParam(int w, int h){
        return new LinearLayout.LayoutParams(w, h);
    }

}
白の部分が追加です。
画像は自分で用意してください。
設計方法は、
地図の描画は今まで公開した方法と同じ。(Android
Studio で自動作成されたコードと同じ)
m_linearLayoutにボタンを配置
FrameLayoutにlinearLayoutをviewとして追加
FrameLayoutをMapsActivityにviewとして追加
MapsActivityにグーグルマップとボタンのフレームが統合された。 |
